Pages

Showing posts with label Do Crafts. Show all posts

Sunday, May 03, 2015

Hey Mr Mister ....

Male cards ... hmmm they seem to stump many people, especially me!  


With ladies themed cards there are oodles and oodles of things out there to make the card pretty but boy, when it comes to male cards sometimes it's a little bit sparse.  Yes I know there are many masculine items too but sometimes creating things can cause a total mental block which sends you into a mad panic as a birthday approaches or Father's day!  Can I really make another golf themed card this year for dad?!?!


Yesterday I was demoing over at Craftworld in Hillington at their Spring Paper Exravaganza (which is on today too) and was working with one of docrafts latest releases, Mr Mister


This range will certainly help to make those male cards and there is so many fab things in the range that you can embellish the cards without the need for bling :)

I will leave you with this card which was the most popular card at the demo ... My Hero!


Thanks for stopping by

Beckie  :O)

Sunday, August 03, 2014

Wedding Crackers

The summer season brings lots of weddings and today I thought I would share a little idea that could be used as favours for the guests.  I have this amazing die from Xcut which is a cracker and along with the Bella 'My Romance' Wedding range it is just perfect for creating these non Christmas crackers.  


Once I made the crackers up and filled them with goodies.  I tied them with some ribbon and then made some toppers to go on each of them. 


I used the spellbinders scallop and circle dies for the base of the toppers and then added some of the Bella! wedding embellishments to finish them, the little 'Bride and Groom' toppers are in the die-cut pack.   
I pierced some holes around the edge.


Products Used

The Bella! My Romance collection is a soft pink and blue palette but of course these would look amazing in the other Bella! Wedding ranges which can be seen on the Ruby Rock-It website.

Thanks for stopping by

Saturday, July 12, 2014

A Little Bag Charm


When I opened my box of goodies from Epiphany Crafts, I was rather excited about one of the products sent to me.  I used the beautiful Ruby Rock-It Heritage collection along with the Epiphany Crafts Metal Charms to create this wee bag charm.


The Heritage collection comes with fantastic embellishments which included 3D butterflies but for this I was drawn to using the wood vaneer.

I painted the bird cage using some metallic paint as I wanted it to look like metal.  Once it had dried I added some bling and lace .


Next I inked one of the flowers from Ruby Rock-It's Oriental wood vaneer with some Tim Holtz distress inks.


These little charms from Epiphany crafts are brilliant for framing mini photos and matching embellishments.  The photo I used was tiny but I was able to get the two faces in and sealed with the circular bubbles.  


The little beads I threaded on the wire, which hold the photo charms, are strips of the Heritage paper rolled up and secured with glue.


To finish the bag charm I glued an extra piece of paper at the back of the bird cage after securing the charms in place. Then I added a key chain and tied some ribbon around the top.


Friday, June 06, 2014

DCM - June Colour Palette

The new dare is up over on the Daring Cardmakers blog and it's colour palette week.
Kathy chose this beauty with hues of purples and a splash of black and dared us (and you) to create a card using it as inspiration.


Here is the card I made


This is my favourite stamp at the moment and is 'Dancin Mae' from Some Odd Girl.  It really sums me up really!! I decided to colour (not well) Mae in purples and greys and used a mix of Promarkers and Kurecolor pens to do this.  The lilac card really makes the image pop and I just love the Spellbinder Nestabilities Lacy Circles die to mat it on.


The flowers down the side are the Jewel Flowers and Flourishes Cut - Emboss - Stencil dies from Spellbinders and I have been able to use them in my Xcut Xpress machine with the tan mat so I have edges are embossed.  

I have found that you need to set the dial on the Xcut Xpress machine to 5 - 5.5 and then run it through again with the tan mat on top.  The beauty of the Xpress machine is that it can be tweaked ever so slightly to get the perfect cut/emboss!


The papers behind are from one of Ruby Rock-it's older wedding releases, Two Hearts Flourish but are still fantastic to use.  I often get asked too which ink I have used so here I have used the Brilliance Black ink and clear embossing powder.

The rest of the Dare Cardmakers DT have made some beauties too so please do head on over and take a look!

Have a wonderful day!
Beckie :)

Thursday, April 24, 2014

Catching Our Dinner

02-RRCT- blogg banner (2)

To me scrapbooking is all about taking the memories we have made and making them into treasured pieces of creativity for future generations to see.  I love it when I walk into the lounge and my little people are browsing though my albums remembering all the good times.

We had a recent trip to one of my favourite places on earth ever and I thought I would share with you a little post about why I decided to scrap these photos taken on a fishing trip while there ....

Wed pics

These photos were taken of the little people showing us their 'catch' while out fishing!  They were all so proud of what they caught and some were keener to show it off than others! I luckily was behind the camera as you wouldn't catch me holding a fish!  
I wanted to use these photos as this was such a special time for them and also to show the girls that they did 'once' hold a slimy fish!!
I used the Ruby Rock-It {Camping Mini Theme} collection which was just perfect for these photos.
Here is the finished layout

RRBF Wed Beckie Dreyer

The 6x4 photo as to set the story showing them waiting patiently for a fish to bite.  While the smaller photos show the main point of making the layout.

Wed  2

I used some yellow paint on the {Fundamentals Kraft Alphabets} as I wanted them to co-ordinate with the paper and stand out on the wood effect paper.  When the paint was dry I added some black dots down one edge.  The {Fundamentals Chocolate Petites} help to start the title off.

Wed 4

I love the way this layout turned out and had fun remembering their excitement as they each reeled in their fish as I was creating it.
I hope you are inspired to print out some photos of a special time you have had and make those memories come alive for all to see years down the line.
Have a great day!
Beckie

Friday, April 18, 2014

Daring Cardmakers - Another Dimension

Have you been following the Daring Cardmakers over the last few weeks?  There has been some amazing creations and this week is no different.

Kathy has a fantastic one this week where she is daring us to make a 3D card, here is what I made


I love making these pop up cards!  Kind of a wee bit addicted to them!
The collection I used was the {Papermania Capsule Collections Lincoln Linen}.  I also used the {Xcut Leaves Die} and the {Xcut Delicate Flourishes Embossing Folder} to add some tesxture to the base of the box before I glued it together.

There are some more amazing cards over on the {DCM blog} so please so pop on over and take a look!

Have a very Happy Easter

Beckie :)

Wednesday, April 16, 2014

Using Hazel & Ruby's Stencil Masks On A Layout

A while ago I won some of Hazel and Ruby's stencil masks and they are just amazing!  I first saw Hazel and Ruby when CHA was in full swing and just adored what I my eyes were weeing!
When the stencil masks arrived  I was keen to have a play with them and this time I decided to use the {Central Park Alpha} stencil mask on a layout ....


The stencil masks are SO easy to use and once I started other ideas came rushing into mind so I bet it won't be long before I use them again!


To create the title I first placed my photo to the page (without gluing in place!!) to act as a guide for where I wanted the stencil masks to go.  I then added the alphabet, I overlapped some parts of the letters for an continuous feel before spritzing them with some of the Artiste Spritzing Inks.


Then came the fun reveal bit!!  I laid a paper towel over the masks and soaked up the excess from the spritz.  Next I gently removed the masks and put them back on the sheet for another day!  This is how it turned out and I really love the contrast.


I created the rest of the layout using Hazel and Ruby's {Gone Typo} collection and used the wonderful {Fat Roll Colorblock Quotes Washi Tape}, which I couldn't resist purchasing from Create and Craft when Hazel and Ruby where on there, to add some extra quotes.

I would highly recommend these products to create some fun items with!

Thanks for stopping by
Beckie :)

Friday, March 28, 2014

It's All About The Money

Good morning everyone, I am quickly popping in to share with you my card that I made for this weeks.


This week we were dared to make a card with the money theme.  I decided to make a money wallet.  I love the Docrafts designer die-cuts which are available in some of their collection and they make a perfect flap for money envelopes

Hope you will pop on over to the blog and join in the fun!

Beckie

Friday, March 14, 2014

It's Fairytales over on the DCM blog

Hello everyone today over on the {Daring Card Makers blog} it is all about fairy tales.
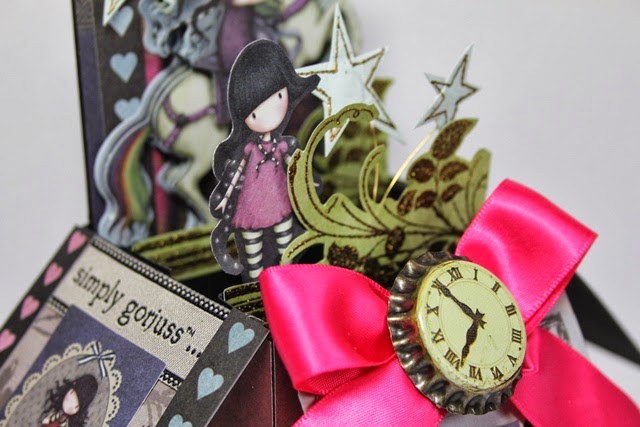
I dug into the the new Gorjuss product from Do Crafts and made this card .....


A lovely lady at my demo told me about these types of card called card in a box.  I found a little tutorial on line by Monica Gale on the web and had a go myself.


I love the 3D effects that these cards can give and the beauty is they fold flat!
The rest of the DT have made some fab cards so please stop by the blog
Have a great weekend
Beckie :)

Thursday, February 06, 2014

Supreme Scrap Tournament - Round 1

A while back I noticed on Jane Dean's facebook page that she had entered a competition and was looking for fellow UK'ers to join her.  Being curious I took a look at this new competition and decided to sign up!  There are weekly challenges and your are up against scrappers from all over the world!  Such awesome creations have already been submitted on the forum and I am totally wowed by them all!
  
Last week the first challenge was posted and here is what we were challenged to do ....

Scrapbooking: 1000 steps from home

Make a double layout or double mixed media project that shows where your live. 
But it all has to be within 1000 steps from your home!!!!

- You can not use any spray inkts!
- You will have to use at least 3 photos on your project (scrapbooking and mixed media!!)
- You will have to add a visible journaling of at least 50 words

Woah! A double layout!  Now that is a huge challenge in it's self!  I am a single page scrapper and this was really going to push out my creativity boat ..... but I loved creating this layout


Products Used : Papermania Madame Payraud, Artiste Paints, Kuretake Pens

When the snow {finally} decided to visit our home, we were all so excited!  I wanted to use the kraft background to create this layout.  This way I could have some fun with acrylic paint.  On the right side of the layout I used some sequin waste to act as a mask and used my fingers to apply the paint over it.  


Then came the messy fun!  I dipped some twine into the paint and covered it before laying it randomly on the background.  I loved the swirly effect it gave, a symbol of the wind which came with the snow!


Then I noticed there was a card making challenge too .....

Make a ATC card where Home is the theme. (ATC size = 2.5x3.5 inches or 64x89 mm)
It can be anything you want. It can be a welcome home card, a card about moving, a card with any quote on being/feeling at home or use the shape of a house.

- There hase to be a title/quote/wish on the card
- You can not use any spray inkts or flowers
- You can not use any kind of cutting machine
- You can not use any image with a house on it (that is a challenge huh!!!)

and here is what I made


Just LOVE this quote and really it says it all

Today I have been making stories in my home and having a heap of messy creative fun.

Thanks for stopping by

Beckie :) 

Tuesday, November 12, 2013

The Countdown To Christmas Is On!

Time really does fly, no sooner has Halloween left flying off on her lonesome broom than we see the shops filled with reds and greens and all things that glitter and sparkle.  It can only mean one thing ....

{Christmas is on the way and I love Christmas!}

I have an advent calendar to help me get even more excited about the 24th of December when Santa comes to visit.  I know that the shelves are filled with advent calendars with chocolate waiting behind every door but I just love the ones with the simple bell, present or maybe a big bow which are revealed as the wee door is opened each day.

So when I was making some goodies to sell I created this


The papers I used here are the Papermania Country Companions Winter Wishes.  I love the colours and fun little designs on the papers.  I even dug out my Sizzix Smoothie Alphabet dies for the numbers!


I made it to look like a little drum.  The countdown are just blocks from my little peoples old toys ( I remember saying that I'll use them one day!!)


and of course the wee hedgie is just adorable clutching his poinsettia.  Adding a decoupage adds some texture to the base of the countdown.

After making a few of these I am hopeful that they will make other people smile as they count down to Christmas themselves.

Have a great day
Beckie :)

Monday, November 04, 2013

Thankful

November is the month where some of my friends on my facebook write each day what they are thankful for and I love seeing it!  I have so many wonderful things in my life to be thankful for, too many to list but this week I am most thankful for getting my DT assisgnments and all that I need to get done ... finished.  Why? because I have been signed off work and be told not to craft!

And why is it that now I have ideas flying around my head!!

So I am resting up my arm and having to type with my left hand (slowly) but I still have some work that I can share with you from creations I have made of the past few months.  These are demo cards made for DO Crafts using the Papermania 12 days of Christmas collection :


For this card I used the 12 Days of Christmas Xcut dies and created a little drummer boy by cutting him out in different colours before layering him up.  The 6 x 6  filigree cards in this range are just stunning and make a brilliant backdrop for you designs


This card is made with the 12 Days of Christmas 8 x 8 pop up cards.  I changed the colour of the centre of the die cut pop up with some gold tinsel embossing powder.  To do this I simply placed some scrap paper behind the design and then inked it.  Next I added some embossing powder and then heated it to set it.  After removing the paper I built up the card using the 12 x 12 papers and having the inside with a sparkling surprise is fab!

Have a great day

Beckie :)